Linux on the Sony VAIO Z505LS
This page describes my experiences with installing Linux on a Sony Vaio Z505LS. The steps should also apply to the Z505LSK, since the only difference to the LS seems to be that the LSK comes with Windows 2000. But since I don't have the LSK model, I can not confirm that. Note that this document currently only describes the basic setup. I want to explore some more features (e.g., IrDA) in the future (when I find the time.)Please send comments, feedback, etc. to
Contents
- Disclaimer
- The hardware
- The distribution
- Partitioning the disk
- Disable PnP BIOS setting
- Installation without a CD-ROM drive
- Installing and using X
- Modem
- USB
- Sound
- IrDA (not yet explored)
- Wireless network card
- Miscellaneous Experiences
- Credits
Disclaimer
The usual disclaimer applies:I take no responsibility for anything that you may do as a result of reading this page. The contents of this page are provided 'as is' with no warranty. With that out of the way...
The hardware
| The specs of the Z505LS | |
| CPU | Intel Pentium III 750MHz |
| RAM | 128MB |
| Hard Disk | 20GB |
| Display | 12" TFT |
| Display Chipset | ATI Rage Mobility-M1 AGP 8MB |
| Audio Chipset | Yamaha DS-XG PCI (chipset YMF744) |
| Ethernet | Intel EtherExpress Pro 100 |
| Modem Chipset | Conexant (Rockwell) WinModem |
| USB | |
| FireWire (IEEE 1394) | |
| Floppy | USB |
| Memory Stick | |
| JogDial | |
| My additions | |
| RAM | Upgrade to 512MB |
| Hard Disk | Replaced the disk with a 60GB disk |
| DVD-ROM | External DVD-ROM drive using a PCMCIA card |
| Wireless Ethernet | Proxim Orinoco 11a/b/g ComboCard Gold (PC Card) |
The distribution
I am using Slackware 10.2. My earlier experiences with Slackware 7.1 are listed here. I have used Slackware for about a decade now, and I think I am quite familiar with it, so I figured the setup should not cause many problems.Partitioning the disk
With the new 60GB disk, I could do the partitioning from scratch. So there is nothing special to report. For the old disk, I had to repartition the disk, which I described here. I am still doing dual-boot with Windows XP.Disable PnP BIOS setting
The "Plug and Play OS" setting in the BIOS should be disabled. If this is not done, there are going to be problems with the sound setup (see below.)To enter the BIOS, the F2 key needs to be pressed while the Sony logo is shown on the display.
Installation without a CD-ROM drive
I didn't have a CD-ROM drive, so I had to find a way to bypass the 3-disk boot strategy used by Slackware. Enter ZipSlack. This is a Slackware distribution that can be installed on a FAT partition (or a Zip disk, hence the name), and run via loadlin.I installed ZipSlack on the FAT32 partition, booted from a WinME floppy disk, and ran it via loadlin.
Now I could use the standard Slackware installation, with the source media accessed over an NFS connection from my desktop Linux machine.
Something that is new with Slackware 10.2 (or at least I didn't notice before) is a rootdisk for use on a FAT partition, in the rootdisks/ directory, as rootdisks/install.zip. This can be unzipped on a FAT partition, and can then be used to run an install.
Slackware 10.2 comes with a 2.4 kernel. For the boot with ZipSlack or the FAT rootdisk the 2.4 kernel is a requirement, since the UMSDOS filesystem needed for booting from DOS hasn't been ported to the 2.6 kernel series.
Once the installation was done, I updated to the 2.6 kernel series, currently using 2.6.15. I installed LILO in the MBR, adding an entry to boot Windows as well.
Installing and using X
Nothing special to report here. X works just fine.Since I had several requests for my XF86Config file, I decided to put it online here. I am running XFree86 4.1.0. Note that this file won't work for XFree86 3.x.
Slackware 10 changed from XFree to X.Org's X server. The configuration files didn't really change much, but the filenames are different now. My xorg.conf file is here.
Modem
The modem is a WinModem, so it does not work under Linux. There are efforts to provide support of these modems under Linux at http://www.linmodems.org/, but I haven't followed these efforts much, since I don't need the modem.USB
With the 2.6 kernel, the USB floppy works just fine.I also tried a USB-to-Ethernet adapter (D-Link DSB-H3ETX), which uses the Pegasus USB Ethernet driver. I since moved it to my desktop machine, but it was nice to test it on the laptop. It was working very well.
Other USB devices I use include the usual memory sticks. No problems with that.
Sound
The ALSA driver supports the Yamaha DS-XG/YMF744 chipset. The driver is included in the 2.6 kernel, so I just needed to enable it in the kernel configuration.Note that the output is muted by default. You have to explicitly unmute it.
Note that you should disable Plug and Play in the BIOS to avoid sound problems. The ALSA mailing list archives have a thread on this issue.
Wireless network card
Slackware 10.2 comes with all the wireless tools. My Orinoco ComboCard needs the Madwifi driver for the Atheros chipset which is available here. Obviously, I checked the driver availability before buying the card...I have run the card in all three wireless environments.
Since I am using the wireless card in different network environments, I needed a way to distinguish between them. A cool solution was to add text like
append="LOCATION=home" to lilo.conf.
The startup files can then distinguish between the different locations.An additional difficulty resulted from a new feature of the Madwifi drivers: the new madwifi-ng code has a Virtual AP mode.
With this mode, the hotplugging subsystem sees at least two events: one for the wifi0 device when the card is plugged in, and one for each activation of a virtual interface. Handling this required changes to the hotplug files and the startup files.
I list some of my startup files and some excerpts below that highlight the necessary changes. One file (rc.madwifi-ng) is a new file specifically to start the virtual APs that the Madwifi driver supports. While I was at it, I fixed some minor issues that I had come across in the startup files as well.
I modified the rc.wireless file to support the usual start/stop parameters. The rc.wireless.conf file was modified to allow for location-specific entries. The selection is not only done by MAC address, but by the combination of location and MAC address.
Finally, I also put a diff file up that makes it easier to apply the changes. The diff file does not cover the changes to lilo.conf nor to modprobe.conf.
Note that the latest madwifi-ng code has a parameter to automatically create a virtual interface (see here.) My hotplugging subsystem changes continue to work with the autocreate=none parameter set in /etc/modprobe.conf.
- /etc/lilo.conf
- /etc/modprobe.conf
- /etc/hotplug/net.agent
- /etc/rc.d/rc.pcmcia
- /etc/rc.d/rc.inet1
- /etc/rc.d/rc.inet1.conf-home
- /etc/rc.d/rc.inet1.conf-office
- /etc/rc.d/rc.madwifi-ng
- /etc/rc.d/rc.wireless
- /etc/rc.d/rc.wireless.conf
- diff file for easy application of the changes.
Miscellaneous Experiences
I got a couple of questions regarding suspend to disk. I have not been able to get suspend to disk working. Suspend to memory works fine, by using APM or using the on/off slider at the right side.Although Sony claims the maximum memory is 256MB, some memory vendors offer 256MB modules for a total of 384MB. I recently bought such a 256MB memory upgrade, and it works fine in my machine.
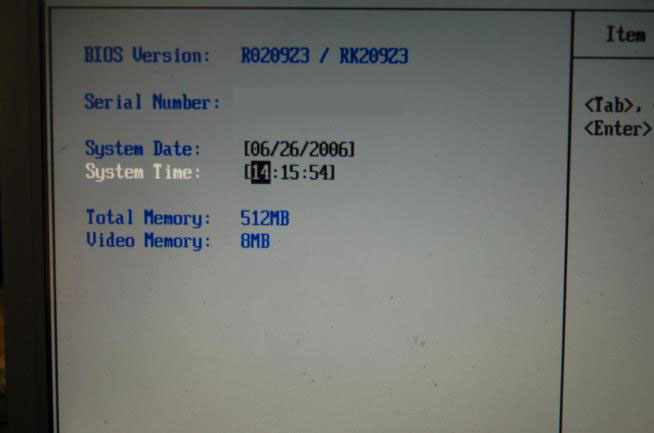
In fact, the maximum memory can be pushed to 512MB. The original 128MB are not soldered in, as I had thought, but are just another 128MB laptop memory stick.
Intermittent problems with the CPU caused me to take a closer look at the motherboard. When I took out the motherboard, I saw the 128MB stick on the bottom (solder) side of the motherboard, and decided to replace it with a 256MB upgrade, resulting in 512MB overall. A screenshot is here.
Note that taking the motherboard out is not for the faint of heart! Do at your own risk!
Credits
Very helpful in getting this effort underway was the Linux on Laptops website, especially since it includes links to other sites that describe installing and running Linux on Z505 laptops.Thanks also to the ALSA project for their sound driver.
Finally, a big thank-you to the Madwifi project.


